
By utilizing PWM to control the LEDs on both modules, you can achieve an enchanting effect where light appears to be seamlessly transferred from one module to the other as you tilt them. This phenomenon is reminiscent of pouring water from one cup to another, hence the aptly named “Magic Light Cup.”
Designed to be compatible with popular electronics platforms such as Arduino, Raspberry Pi, ESP32, and others, this module offers versatility in various projects.
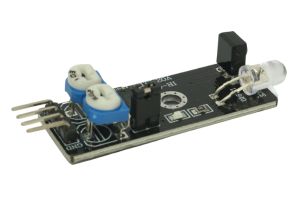
Arduino KY-027 Magic Light Cup Module – Technical Specifications:
- Operating Voltage: 3.3V ~ 5.5V
- Board Dimensions: 1.5cm x 3.6cm [0.6in x 1.4in]
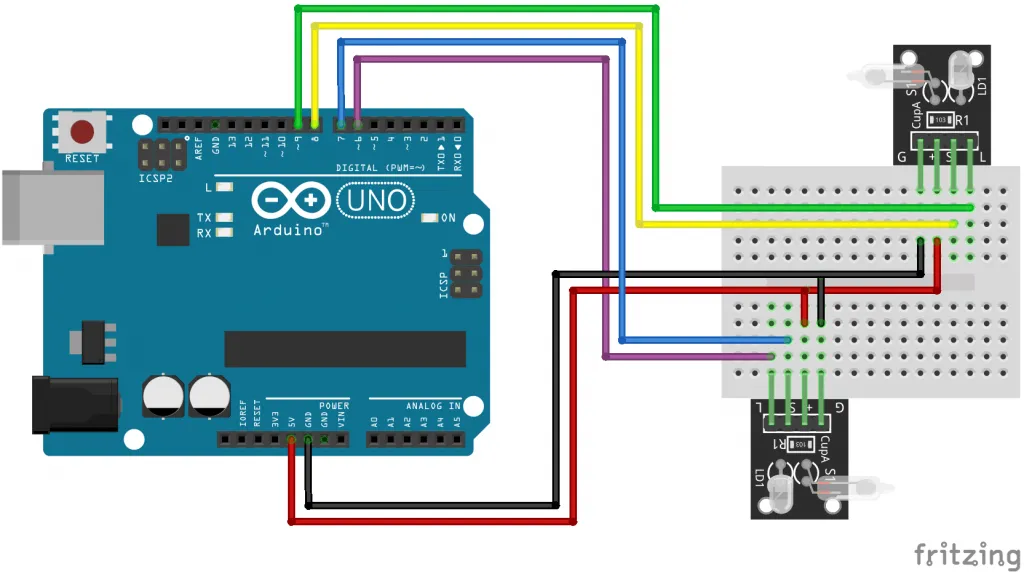
Connection Diagram: Connect the modules using the following diagram:
KY-027 (A) to Arduino:
- G: GND
- +: +5V
- S: 8
- L: 9
KY-027 (B) to Arduino:
- G: GND
- +: +5V
- S: 7
- L: 6
Arduino Code for KY-027:
int ledPinA = 9;
int switchPinA = 8;
int switchStateA = 0;
int ledPinB = 6;
int switchPinB = 7;
int switchStateB = 0;
int brightness   = 0;

void setup() {
  pinMode(ledPinA, OUTPUT);
  pinMode(ledPinB, OUTPUT);
  pinMode(switchPinA, INPUT);
  pinMode(switchPinB, INPUT);
}

void loop() {
  switchStateA = digitalRead(switchPinA);
  if (switchStateA == HIGH && brightness != 255) {
    brightness++;
  }

  switchStateB = digitalRead(switchPinB);
  if (switchStateB == HIGH && brightness != 0) {
    brightness--;
  }

  analogWrite(ledPinA, brightness);  // A slow fade out
  analogWrite(ledPinB, 255 - brightness);  // B slow bright up
  delay(20);
}
In this Arduino sketch, both modules collaborate to create the captivating Magic Light Cup effect. The digital signals from the mercury switches regulate the LED brightness using PWM. Position the modules so that the mercury switches face in opposite directions, causing the brightness to shift between them as you tilt, giving the illusion of light magically passing from one module to the other.


This is a tilt sensor with a light, not an RGB LED. This tutorial makes no sense 🙁