OLED (Organic Light-Emitting Diode) displays have gained immense popularity in the electronics hobbyist community due to their vibrant colors, high contrast ratios, and low power consumption. In this article, we’ll delve into the fascinating world of OLED displays, focusing on the 0.95-inch variant and how you can interface it with an Arduino.
Understanding OLED Displays
OLED displays are made up of organic compounds that emit light when an electric current is applied. Unlike traditional LCDs, OLEDs don’t require a backlight, leading to more vibrant colors and improved energy efficiency.
The 0.95-inch OLED display is a compact yet powerful component that can be integrated into various projects, from wearable devices to data loggers.
Hardware Components
To get started, you’ll need the following hardware:
- Arduino Board (e.g., Arduino Uno)
- 0.95-Inch OLED Display
- Jumper Wires
- Breadboard
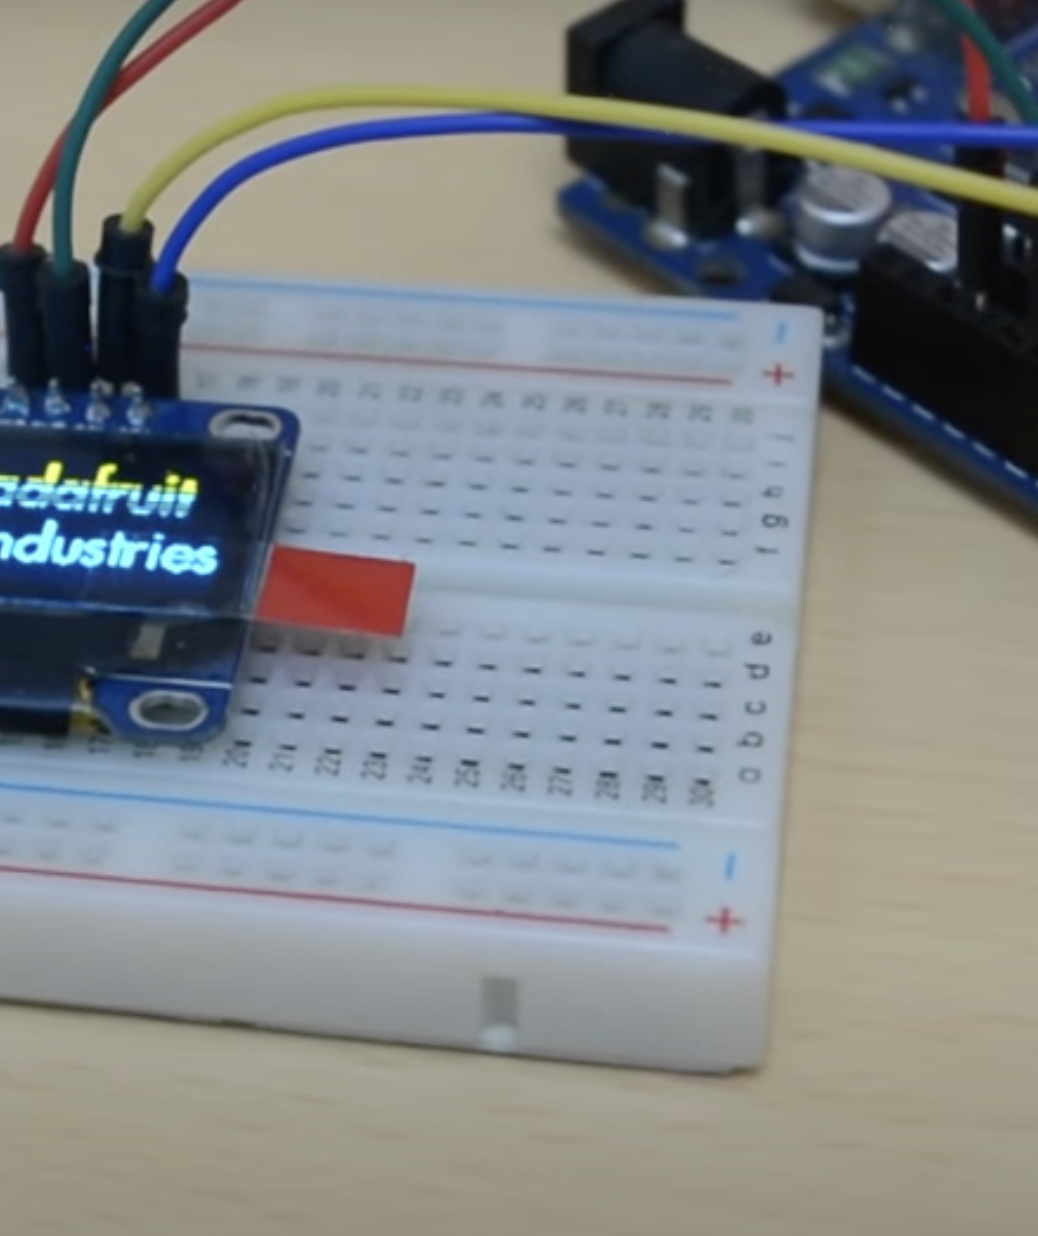
Wiring the OLED Display
Connect the OLED display to the Arduino as follows:
- VCC to 5V on Arduino
- GND to GND on Arduino
- SCL to A5 on Arduino
- SDA to A4 on Arduino
Ensure your connections are secure and double-check the pin mappings to avoid any issues.
Installing Necessary Libraries
To make programming easier, you’ll need to install the necessary libraries. Open the Arduino IDE, navigate to “Sketch” > “Include Library” > “Manage Libraries.” In the Library Manager, search for “Adafruit SSD1306” and “Adafruit GFX” libraries. Install them both.
Writing the Code
Now, let’s create a simple Arduino sketch to display text on the OLED screen:
#include <Wire.h>
#include <Adafruit_GFX.h>
#include <Adafruit_SSD1306.h>

#define SCREEN_WIDTH 128
#define SCREEN_HEIGHT 64
#define OLED_RESET    -1

Adafruit_SSD1306 display(SCREEN_WIDTH, SCREEN_HEIGHT, &Wire, OLED_RESET);

void setup() {
  if(!display.begin(SSD1306_I2C, 0x3C)) {
    Serial.println(F("SSD1306 allocation failed"));
    for(;;);
  }

  display.display();
  delay(2000);  // Pause for 2 seconds
  display.clearDisplay();
}

void loop() {
  display.setTextSize(1);
  display.setTextColor(SSD1306_WHITE);
  display.setCursor(0,0);
  display.print(F("Hello, Arduino!"));

  display.display();
  delay(2000);  // Pause for 2 seconds
  display.clearDisplay();
}
0.95-Inch OLED Arduino
This code initializes the OLED display, prints “Hello, Arduino!” on the screen, and clears the display after a 2-second delay.
Uploading the Code
Connect your Arduino to your computer, select the correct board and port in the Arduino IDE, and upload the code.
Congratulations! You’ve successfully interfaced a 0.95-inch OLED display with an Arduino. This is just the beginning — OLED displays offer a wide range of possibilities, from displaying sensor data to creating interactive user interfaces. Experiment with graphics, animations, and different libraries to unlock the full potential of OLED technology in your projects. Happy tinkering!


Dear sirs
Sorry to tell you, but for some reason it does not work AT ALL
Would you guys be so kind as to look it up?
Sankiu