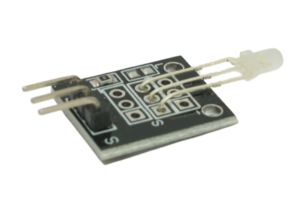
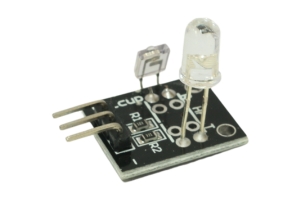
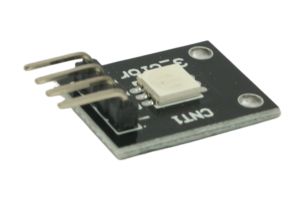
The Two Color LED Module is a captivating component that houses two LEDs of different colors in a single package. By controlling the two LEDs separately, you can create various combinations of colors and visual effects in your Arduino projects. In this step-by-step guide, we’ll show you how to set up the Two Color LED Module with an Arduino and create projects that light up your world with dual glow.
Materials Needed:
- Arduino board (e.g., Arduino Uno, Arduino Nano)
- Two Color LED Module (common cathode or common anode type)
- Breadboard and jumper wires
- USB cable for Arduino
- Computer with the Arduino IDE installed (https://www.arduino.cc/en/software)
Step 1: Wiring
Connect the Two Color LED Module to the Arduino board as follows:
- For common cathode type:
- Connect the module’s GND (Ground) pin to the GND pin on the Arduino.
- Connect each of the module’s C1 (Color 1) and C2 (Color 2) pins to separate digital pins on the Arduino (e.g., C1: D3, C2: D5).
- For common anode type:
- Connect the module’s VCC (Voltage) pin to the 5V pin on the Arduino.
- Connect each of the module’s C1 (Color 1) and C2 (Color 2) pins to separate digital pins on the Arduino (e.g., C1: D3, C2: D5).
Step 2: Arduino Code
Open the Arduino IDE and create a new sketch. Then, enter the following code:
// Pin numbers for the Two Color LED Module (Change these if you used different pins)
const int color1Pin = 3; // Digital pin connected to Color 1 of the Two Color LED Module
const int color2Pin = 5; // Digital pin connected to Color 2 of the Two Color LED Module

void setup() {
  pinMode(color1Pin, OUTPUT); // Set Color 1 pin as OUTPUT
  pinMode(color2Pin, OUTPUT); // Set Color 2 pin as OUTPUT
}

void loop() {
  // Turn on Color 1 (e.g., Red)
  setColor1(true);
  delay(1000); // Wait for 1 second

  // Turn off Color 1
  setColor1(false);
  delay(500); // Wait for 0.5 seconds

  // Turn on Color 2 (e.g., Green)
  setColor2(true);
  delay(1000); // Wait for 1 second

  // Turn off Color 2
  setColor2(false);
  delay(500); // Wait for 0.5 seconds
}

// Function to control Color 1
void setColor1(bool on) {
  digitalWrite(color1Pin, on ? HIGH : LOW);
}

// Function to control Color 2
void setColor2(bool on) {
  digitalWrite(color2Pin, on ? HIGH : LOW);
}
Step 3: Uploading the code
Connect your Arduino board to the computer using the USB cable and select the appropriate board and port from the Arduino IDE. Then, click the “Upload” button to upload the code to the Arduino.
Step 4: Dual Glow
Once the code is uploaded successfully, the Two Color LED Module will cycle through the two colors (e.g., Red and Green) in an infinite loop, creating a dual glow effect.
Step 5: Experiment and Illuminate
Now that the Two Color LED Module is set up and displaying colors, you can experiment with different combinations of color switching and timings to create mesmerizing lighting effects. Adjust the code to create your desired color combinations and patterns.
Congratulations! You’ve successfully set up and used the Two Color LED Module with Arduino. This captivating module allows you to control dual colors and lighting effects in your Arduino projects, making it ideal for decorative lighting, mood setting, and visual displays. Have fun experimenting and incorporating the Two Color LED Module into your Arduino projects to illuminate your world with a mesmerizing dual glow!


