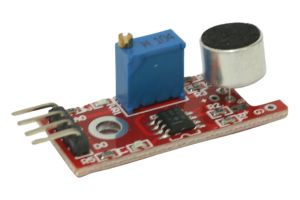
The Big Sound Sensor Module, also known as a Sound Detector Module, is a sensor that can detect sound and noise levels in its surroundings. It converts sound vibrations into electrical signals, making it useful for sound-activated projects, noise monitoring systems, and interactive audio applications. In this step-by-step guide, we’ll show you how to set up the Big Sound Sensor Module with an Arduino and create projects that respond to different sound levels.
Materials Needed:
- Arduino board (e.g., Arduino Uno, Arduino Nano)
- Big Sound Sensor Module
- Resistor (10k ohms)
- LED and a 220 ohm resistor (optional, for visual indication)
- Breadboard and jumper wires
- USB cable for Arduino
- Computer with the Arduino IDE installed (https://www.arduino.cc/en/software)
Step 1: Wiring
Connect the Big Sound Sensor Module to the Arduino board as follows:
- Connect the module’s AO (Analog Output) pin to the A0 analog input pin on the Arduino.
- Connect the module’s GND (Ground) pin to the GND pin on the Arduino.
- Connect the module’s VCC (Voltage) pin to the 5V pin on the Arduino.
- Place a 10k ohm resistor between the AO pin on the module and the VCC pin on the module.
Step 2: Optional Visual Indication (LED)
If you want to add a visual indication of sound detection, connect an LED with a 220 ohm resistor in series between a digital pin (e.g., D2) and the GND pin on the Arduino. Connect the digital pin to the anode (longer leg) of the LED and the cathode (shorter leg) to the resistor, then connect the other end of the resistor to GND.
Step 3: Arduino Code
Open the Arduino IDE and create a new sketch. Then, enter the following code:
const int soundSensorPin = A0; // Analog pin connected to the Big Sound Sensor Module
const int ledPin = 2; // Digital pin connected to the LED (optional)

void setup() {
  pinMode(soundSensorPin, INPUT); // Set the Sound Sensor pin as INPUT
  pinMode(ledPin, OUTPUT); // Set the LED pin as OUTPUT (optional)
  Serial.begin(9600); // Initialize serial communication for debugging (optional)
}

void loop() {
  int soundValue = analogRead(soundSensorPin); // Read the analog value from the Sound Sensor

  // Display the sound sensor value on the Serial Monitor
  Serial.print("Sound Level: ");
  Serial.println(soundValue);

  // Adjust the threshold value according to your environment
  int threshold = 400;

  if (soundValue > threshold) {
    // Sound detected! Add your desired action here.
    // For example, turn on the LED as a visual indication of sound detection.
    digitalWrite(ledPin, HIGH);
  } else {
    // No sound detected, turn off the LED (optional)
    digitalWrite(ledPin, LOW);
  }

  delay(100); // Add a small delay to avoid rapid repeated detections
}
Step 4: Uploading the code
Connect your Arduino board to the computer using the USB cable and select the appropriate board and port from the Arduino IDE. Then, click the “Upload” button to upload the code to the Arduino.
Step 5: Observing Sound Detection
Once the code is uploaded successfully, open the Serial Monitor from the Arduino IDE (Ctrl + Shift + M). The Serial Monitor will display the analog values from the Sound Sensor, indicating the detected sound level. Additionally, if you connected an LED as a visual indicator, it will light up when sound is detected.
Step 6: Experiment and Interact
Now that the Big Sound Sensor Module is set up and responding to sound levels, you can experiment with different sound sources and their intensities. Adjust the code to trigger various actions or events based on specific sound thresholds. For example, you can use the sound sensor to control lights or trigger sound effects based on the noise level in your environment.
Congratulations! You’ve successfully set up and used the Big Sound Sensor Module with Arduino. This versatile sensor allows you to detect sound and create interactive projects that respond to different sound levels. Have fun experimenting and incorporating the Big Sound Sensor Module into your Arduino projects to enhance interactivity and responsiveness with the power of sound!


