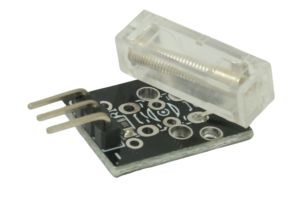
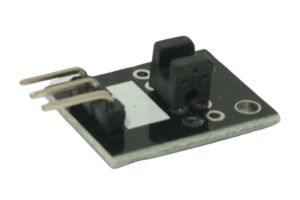
The Tap Sensor module is a fun and interactive component that can detect physical tapping or vibrations. It is a perfect choice for creating touch-sensitive projects or interactive installations that respond to taps or knocks. In this step-by-step guide, we’ll show you how to set up the Tap Sensor module with an Arduino and create projects that react to taps in the environment.
Materials Needed:
- Arduino board (e.g., Arduino Uno, Arduino Nano)
- Tap Sensor module
- Breadboard and jumper wires
- USB cable for Arduino
- Computer with the Arduino IDE installed (https://www.arduino.cc/en/software)
Step 1: Wiring
Connect the Tap Sensor module to the Arduino board as follows:
- Connect the module’s VCC (Voltage) pin to the 5V pin on the Arduino.
- Connect the module’s GND (Ground) pin to the GND pin on the Arduino.
- Connect the module’s DOUT (Digital Output) pin to any digital pin on the Arduino (e.g., D2).
Step 2: Arduino Code
Open the Arduino IDE and create a new sketch. Then, enter the following code:
const int tapSensorPin = 2; // Digital pin connected to the Tap Sensor module's DOUT pin

void setup() {
  pinMode(tapSensorPin, INPUT_PULLUP); // Set the Tap Sensor pin as INPUT_PULLUP
  Serial.begin(9600); // Initialize serial communication for debugging (optional)
}

void loop() {
  int tapState = digitalRead(tapSensorPin); // Read the state of the Tap Sensor

  if (tapState == LOW) {
    Serial.println("Tap detected!"); // Display a message when a tap is detected
    // Your custom actions or functions can be added here.
  }

  // Add optional delay to prevent rapid repeated detections
  // delay(100);
}
Step 3: Uploading the code
Connect your Arduino board to the computer using the USB cable and select the appropriate board and port from the Arduino IDE. Then, click the “Upload” button to upload the code to the Arduino.
Step 4: Observing the Tap Sensor Output
Once the code is uploaded successfully, open the Serial Monitor from the Arduino IDE (Ctrl + Shift + M). The Serial Monitor will display “Tap detected!” whenever a tap or vibration is detected by the Tap Sensor module.
Step 5: Experiment and Interact
Now that the Tap Sensor module is set up and responding to taps, you can experiment with different sensitivities and thresholds. Adjust the code to trigger various actions or events in response to different types of taps or vibrations. You can use this sensor in interactive installations, sound-triggered projects, or even as a secret knock detector.
Congratulations! You’ve successfully set up and used the Tap Sensor module with Arduino. This interactive sensor enables you to create projects that respond to physical taps or vibrations, adding an engaging and interactive dimension to your Arduino creations. Have fun experimenting and incorporating the Tap Sensor module into your Arduino projects to create unique and interactive experiences!


