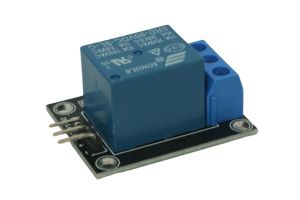
The Relay Module is a powerful component that enables your Arduino projects to control high-power devices, such as lights, motors, and appliances. It acts as an electrically controlled switch, allowing you to turn on and off external circuits with the help of low-power signals from the Arduino. In this step-by-step guide, we’ll show you how to set up the Relay Module with an Arduino and create projects that give you powerful control over electrical loads.
Materials Needed:
- Arduino board (e.g., Arduino Uno, Arduino Nano)
- Relay Module (with signal, VCC, and GND pins)
- External power supply (for high-power devices)
- High-power load (e.g., light bulb, motor)
- Breadboard and jumper wires
- USB cable for Arduino
- Computer with the Arduino IDE installed (https://www.arduino.cc/en/software)
Step 1: Wiring
Connect the Relay Module to the Arduino board as follows:
- Connect the module’s VCC pin to the 5V pin on the Arduino.
- Connect the module’s GND pin to the GND pin on the Arduino.
- Connect the module’s signal pin to a digital pin on the Arduino (e.g., D2).
- Connect the “Normally Open” (NO) and “Common” (COM) terminals of the relay module to the external power supply and high-power load. Please note that the wiring may vary depending on your specific relay module, and some relay modules may require additional components like a transistor and diode for proper operation.
Step 2: Arduino Code
Open the Arduino IDE and create a new sketch. Then, enter the following code:
const int relayPin = 2; // Digital pin connected to the Relay Module

void setup() {
  pinMode(relayPin, OUTPUT); // Set the Relay pin as OUTPUT
}

void loop() {
  // Turn on the relay (activate the external load)
  digitalWrite(relayPin, HIGH);
  delay(2000); // Wait for 2 seconds

  // Turn off the relay (deactivate the external load)
  digitalWrite(relayPin, LOW);
  delay(2000); // Wait for 2 seconds
}
Step 3: Uploading the code
Connect your Arduino board to the computer using the USB cable and select the appropriate board and port from the Arduino IDE. Then, click the “Upload” button to upload the code to the Arduino.
Step 4: Powerful Control
Once the code is uploaded successfully, the Arduino will repeatedly turn on and off the relay, which, in turn, will control the external power supply and high-power load connected to it.
Step 5: Experiment and Automate
Now that the Relay Module is set up and controlling the external load, you can experiment with different relay switching intervals and connect various high-power devices. The relay module allows you to automate the control of electrical loads, making it ideal for home automation and industrial applications.
Congratulations! You’ve successfully set up and used the Relay Module with Arduino. This powerful module enables you to control high-power electrical loads with the ease of low-power signals from the Arduino. Have fun experimenting and incorporating the Relay Module into your Arduino projects for powerful and automated control over electrical devices!


