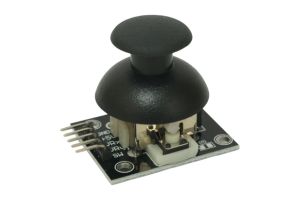
Introduction: The Joystick Module is a fun and versatile input device that allows you to control two axes (X and Y) using a joystick. It is commonly used in gaming, robotics, and remote control applications. In this step-by-step guide, we’ll show you how to set up the Joystick Module with an Arduino and create projects that take you on a joystick joyride.
Materials Needed:
- Arduino board (e.g., Arduino Uno, Arduino Nano)
- Joystick Module
- Breadboard and jumper wires
- USB cable for Arduino
- Computer with the Arduino IDE installed (https://www.arduino.cc/en/software)
Step 1: Wiring
Connect the Joystick Module to the Arduino board as follows:
- Connect the module’s VCC (Voltage) pin to the 5V pin on the Arduino.
- Connect the module’s GND (Ground) pin to the GND pin on the Arduino.
- Connect the module’s VRx (X-axis) pin to an analog input pin on the Arduino (e.g., A0).
- Connect the module’s VRy (Y-axis) pin to another analog input pin on the Arduino (e.g., A1).
Step 2: Arduino Code
Open the Arduino IDE and create a new sketch. Then, enter the following code:
// Analog input pin numbers for X and Y axes
const int xAxisPin = A0;
const int yAxisPin = A1;

void setup() {
  // No setup needed for this example
}

void loop() {
  // Read the analog values from X and Y axes
  int xAxisValue = analogRead(xAxisPin);
  int yAxisValue = analogRead(yAxisPin);

  // Map the analog values to a range of -100 to 100 (optional)
  int mappedXValue = map(xAxisValue, 0, 1023, -100, 100);
  int mappedYValue = map(yAxisValue, 0, 1023, -100, 100);

  // Display the mapped values in the Serial Monitor
  Serial.print("X-axis: ");
  Serial.print(mappedXValue);
  Serial.print("\tY-axis: ");
  Serial.println(mappedYValue);

  // Add a small delay for smooth readings
  delay(100);
}
Step 3: Uploading the code
Connect your Arduino board to the computer using the USB cable and select the appropriate board and port from the Arduino IDE. Then, click the “Upload” button to upload the code to the Arduino.
Step 4: Joystick Joyride
Once the code is uploaded successfully, open the Serial Monitor from the Arduino IDE (Ctrl + Shift + M). The Serial Monitor will display the analog values of the X and Y axes, which change as you move the joystick.
Step 5: Experiment and Control
Now that the Joystick Module is set up and providing analog values, you can experiment by moving the joystick in different directions. Observe how the X and Y axis values change in response to your joystick movements.
Congratulations! You’ve successfully set up and used the Joystick Module with Arduino. This versatile input device allows you to control two axes using a joystick, making it perfect for gaming, remote control, and robotics projects. Have fun experimenting and incorporating the Joystick Module into your Arduino projects for an exciting joystick joyride!


