DC motors are widely used in various robotics and automation projects. The ability to control the speed of a DC motor is essential for achieving precise movements and optimizing power consumption. In this article, we will explore how to implement Arduino code for DC motor speed control using pulse width modulation (PWM).
What is PWM
PWM is Pulse width modulation, it is a technique that allows to simulate analog output using digital signals. And when rapidly switching a digital signal on/off, we can control the average power delivered to a motor or any component. In the case of DC motors, PWM can be utilized to control the speed of DC motor by adjusting the duty cycle of the signal.
Required Components to run and control the speed of dc motor
- Arduino Board
- DC Motor
- H-bridge Motor Driver Circuit or Shield
- Power Supply
There are various Arduino boards available in the market, you can use any to write Arduino code for dc motor and control the speed. In this project I am going to use Arduino Uno because it is widely used, cost-effective and good for beginners.
Choose right driver for DC motor
Again there are several H-bridge motor driver board and shields are available, you have to check the specifications and select the board carefully as per the motor requirements. Here I am sharing few popular Motor driver board which are easily available in the market and you can use in your project and write Arduino code for dc motor.
- L293D Motor Driver Module
- L298N Motor Driver Module
- TB6612FNG Motor Driver Module
- Adafruit Motor Shield
- Pololu Dual VNH5019 Motor Driver Shield
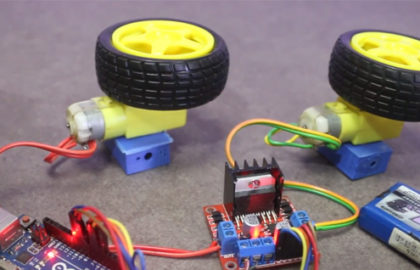
For this project I have selected L293d Motor Driver Module because I am using two dc motors which can operate with 6v to 12v and 200mA, this can drive two DC motors simultaneously and each motor can handle a maximum continuous current of 600mA and upto 36V.
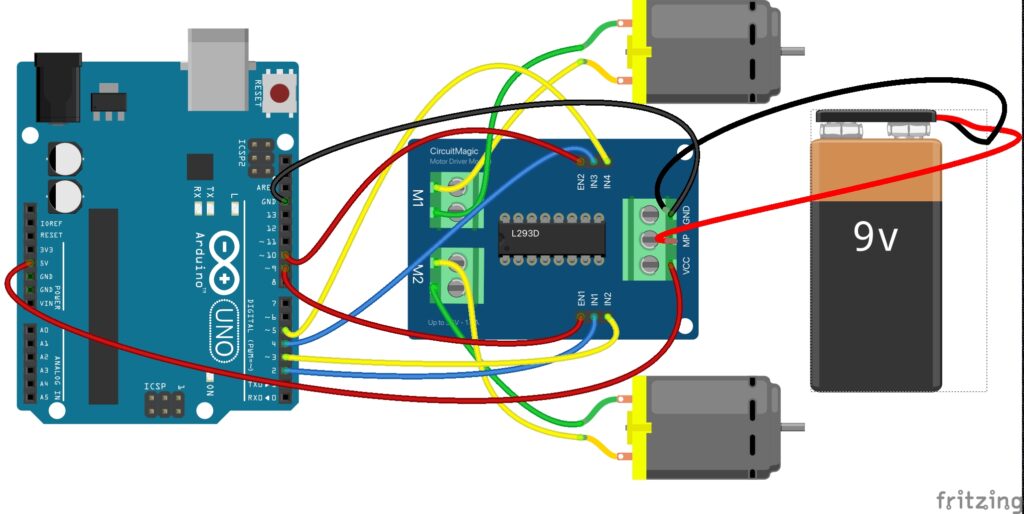
Choose the power source for motor driver
In most of the cases you will need external power source for the motor driver module, you can use Power Supply or the Battery Pack.
Note: I you are using two different power sources for Arduino board and Motor Driver Module, then don’t forget to connect the Arduino ground pin with ground of Driver Module to work properly.
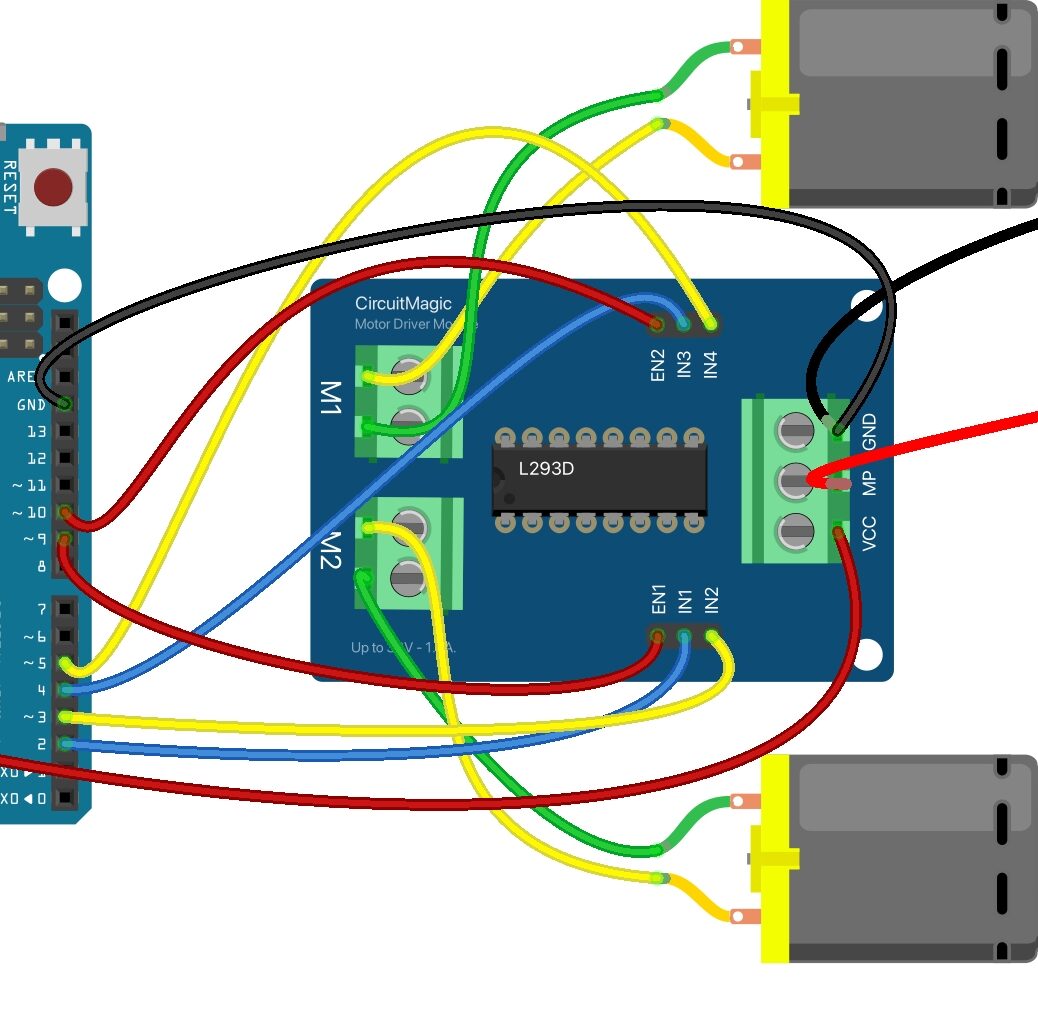
Connection guide for L293d driver and Arduino
- Connect the power supply to the VCC pin of the L293D module.
- Connect the ground (GND) of the power supply, L293D module and Arduino together.
- Connect the first motor to the M1 output connector of the L293D module.
- Now connect the second motor to the M2 output connector.
- Connect the IN1 and IN2 pins of the L293D module to digital pins 2 and 3 of the Arduino for controlling the direction of motor 1.
- Connect the digital pins 2 and 3 of the Arduino to the IN1 and IN2 pins of the L293D module.
- Now connect the digital pins 4 and 5 of the Arduino to the IN3 and IN4 pins of the L293D module.
- Connect the digital pins 9 and 10 (PWM pins) of the Arduino to the EN1 and EN2 of the L293D driver module.
Wiring diagram for L293D Motor driver and Arduino
Double check the above wiring diagram and your connections and make sure, L293D Motor Driver module and Arduino connected properly. Ones the connection are done, we can proceed to the next step, which is write and upload the Arduino code.
Write and upload Arduino code for DC motors to run
// Motor control pins for Motor 1
const int motor1EnablePin = 9;  // PWM pin for motor 1 speed control
const int motor1Pin1 = 2;      // Control pin 1 for motor 1
const int motor1Pin2 = 3;      // Control pin 2 for motor 1

// Motor control pins for Motor 2
const int motor2EnablePin = 10; // PWM pin for motor 2 speed control
const int motor2Pin1 = 4;      // Control pin 1 for motor 2
const int motor2Pin2 = 5;      // Control pin 2 for motor 2

void setup() {
  // Set motor control pins as outputs
  pinMode(motor1EnablePin, OUTPUT);
  pinMode(motor1Pin1, OUTPUT);
  pinMode(motor1Pin2, OUTPUT);

  pinMode(motor2EnablePin, OUTPUT);
  pinMode(motor2Pin1, OUTPUT);
  pinMode(motor2Pin2, OUTPUT);
}

void loop() {
  // Run motor 1 forward and motor 2 backward
  motorControl(motor1EnablePin, 255, HIGH, LOW);  // Motor 1 full speed, forward
  motorControl(motor2EnablePin, 200, LOW, HIGH);  // Motor 2 medium speed, reverse
  delay(2000);

  // Stop both motors
  motorControl(motor1EnablePin, 0, LOW, LOW);     // Motor 1 stop
  motorControl(motor2EnablePin, 0, LOW, LOW);     // Motor 2 stop
  delay(1000);

  // Run motor 1 backward and motor 2 forward
  motorControl(motor1EnablePin, 150, LOW, HIGH);  // Motor 1 medium speed, reverse
  motorControl(motor2EnablePin, 180, HIGH, LOW);  // Motor 2 high speed, forward
  delay(2000);

  // Stop both motors
  motorControl(motor1EnablePin, 0, LOW, LOW);     // Motor 1 stop
  motorControl(motor2EnablePin, 0, LOW, LOW);     // Motor 2 stop
  delay(1000);
}

// Function to control the motor
void motorControl(int enablePin, int speed, int dir1, int dir2) {
  analogWrite(enablePin, speed);  // Set the motor speed using PWM
  digitalWrite(motor1Pin1, dir1); // Set the motor direction
  digitalWrite(motor1Pin2, dir2); // Set the motor direction
}
To upload the above code into your Arduino board, please download and install Android IDE if you don’t have already, connect your Arduino board with PC using USB cable then select write port from the Tools menu and upload the code by clicking upload button. That’s it, motor will start running, you can modify the Arduino code according to the requirement.
Let me know about the your experience with this by comment and if you have any question, issue or suggestion, let me know. I will try to answer you. Thanks!
Bonus links – Arduino and Driver module
If you working on Arduino and Motor Driver module then check out my other article where I write step-by-step guide to control DC motors with L298N driver and Arduino. You can also watch the youtube video for complete instructions and demo How to control DC motor with L298N driver and Arduino


