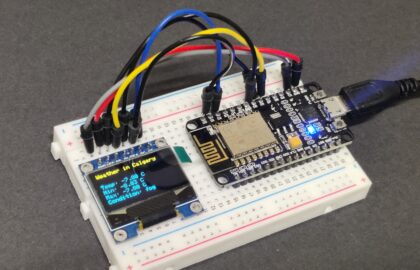
NodeMCU is an open-source IoT platform that uses the ESP8266 Wi-Fi module, which allows for easy integration with the Internet and various other devices. It is based on the Lua scripting language and is programmed using the Arduino IDE.
To use NodeMCU, you will need the following:
- A NodeMCU development board
- A micro-USB cable
- The Arduino IDE software
- A Wi-Fi network to connect to
Here are the basic steps to use NodeMCU with basic code:
- Install the Arduino IDE software You can download the Arduino IDE software from the official website and install it on your computer.
- Add the NodeMCU board to the Arduino IDE To add the NodeMCU board to the Arduino IDE, you need to install the ESP8266 board support package. To do this, go to File > Preferences in the Arduino IDE and paste the following URL in the Additional Boards Manager URLs field:
http://arduino.esp8266.com/stable/package_esp8266com_index.json
Then, go to Tools > Board > Boards Manager, search for ESP8266 and install it.
- Connect the NodeMCU board to your computer Connect your NodeMCU board to your computer using a micro-USB cable. Make sure that the cable is properly connected and the board is getting power.
- Set up the Wi-Fi network To connect the NodeMCU board to the Wi-Fi network, you need to specify the network name and password in the code. Open the Arduino IDE and go to File > Examples > ESP8266WiFi > WiFiScan. Replace the “SSID” and “PASSWORD” fields with your Wi-Fi network name and password, respectively.
- Write and upload the code Now, you can write your own code or use one of the example sketches that come with the Arduino IDE. For example, you can go to File > Examples > ESP8266WebServer > HelloServer to create a simple web server that displays “Hello, world!” when you access it in a web browser.
Once you have written your code, click the Upload button in the Arduino IDE to upload it to the NodeMCU board.
- Monitor the serial output You can monitor the serial output of the NodeMCU board to see the results of your code. To do this, go to Tools > Serial Monitor in the Arduino IDE. Make sure that the baud rate is set to 115200 and the line ending is set to “Both NL & CR”.
That’s it! You can now use NodeMCU with basic code to connect to the Internet, control various devices, and create your own IoT projects.